I haven’t written much for a while – partly because I was too busy, partly because some of the stuff i worked on I couldn’t write about, and mostly, because much of the stuff that I could in theory write about wasn’t exactly “ready enough” to do so. Much of that is now slowly falling into place, though, so it’s about time I start writing some of them up.
Let’s start with pynari (https://pypi.org/project/pynari/) : for those that already know what ANARI is that name will be an immediately recognizable play on two different words – the "py" comes from python, obviously, and the “nari” comes from ANARI…. and that’s exactly what it is: a python-interface for the ANARI ray traced rendering API (including a OptiX/NVIDIA GPU accelerated renderer implementing that API), all installable through pip, and really easy to use from python in a way similar to this:
pip install pynari
then in python:
import pynari as anari

device = anari.newDevice('default')
# create the world:
mesh = device.newGeometry('triangles')
...
world = device.newWorld()
...
world.setParameterArray('surface', anari.SURFACE, ...)
...
frame.setParameter('world',world)
# render a frame:
frame.render()
fb_color = frame.get('channel.color')
(for some complete, ready-to-run samples look here: https://github.com/ingowald/pynari).
ANARI
If you already know what ANARI is (you should!), then the above should be instantly recognizable, and you’ll probably be able to write some ANARI code in python right away. For those that don’t (yet?) know about ANARI, let’s first rectify this.
ANARI is a fairly recent effort by the Khronos group (the guys that are also spec’ing OpenGL, OpenCL, and all other kind of cross-platform things) to standardize an API for “analytical rendering”. Now I’m not entirely sure what “analytical” is really supposed to mean, so let’s just call it by another name: it’s a ray tracing rendering API, plain and simple, roughly based on the same concepts that were originally used in Intel’s OSPRay API (more info on that here: https://www.ospray.org/talks/IEEEVis2016_OSPRay_paper_small.pdf). In particular, compared to the more widely known ray tracing APIs like OptiX, DXR, or Vulkan, the API level in ANARI is “one step higher” : you don’t have a low-level API that traces individual rays (with you having to write the renderer), but instead, the ANARI API is a ray tracing rendering API, where you create a “world”, populate it with “surfaces”, “volumes”, “lights”, etc, and eventually ask it to render a “frame”. You don’t have to be a ray tracing expert (you probably don’t even have to know how it works at all!), you just set up the world, and ask it to render images. For those interested in the official ANARI 1.0 spec – and/or the official SDK – please look here https://registry.khronos.org/ANARI/specs/1.0/ANARI-1.0.html and here https://github.com/KhronosGroup/ANARI-SDK .
PY-NARI
Anyway, back to pynari. The group of users most benefitting from the ANARI API is, of course, group of people that want to use ray tracing, but that do not necessarily want to become experts in writing their own renderers. Having said that, I eventually realized that this description would probably also – and maybe even in particular – fit python users: many python users (in my experience) tend to be really good at just using libraries/packages that do the heavy work (often in native C/C++/CUDA code)… avoiding the need to become experts in whatever is going on inside that package, as long as it has a nice “pythonic” way of accessing its goodies. (C/C++ users instead tend to be the opposite, generally preferring to re-implement each API for themselves “just because” …. well, guilty as charged, i guess ![]() ).
).
So, having realized that ANARI should in theory be pretty useful to at least some python users (there just must be some folks out there that wants to do generate some ray traced images in python!) the next task was to figure out how to make that accessible to such users – enter pynari. The first decision I made was to write my own python interface (said pynari): the ANARI SDK already does provide some low-level python bindings, but these only expose the C99 API, and I didn’t think that that was sufficiently “pythonic” for the typical python user. As such, for pynari I took the liberty of slightly deviating from the C API, and instead adopted a much more object-oriented API (which actually fits ANARI very well, because ANARI itself is all about different “objects” that jointly describe what is to be rendered). For example, what in the official C-99 interface looks like this:
ANARILibrary library = anariLoadLibrary("default",...);
ANARIDevice device = anariNewDevice(library,...);
anariCommitParameters(device,device);
ANARICamera camera
  = anariNewCamera(library,device,"perspective");
anariSetParameter(device, camera, 'aspect',
                  ANARI_FLOAT32, width/height)...
… in pynari becomes what I’d consider more pythonic like this:
import pynari as anari
device = anari.newDevice('default')
camera = dev.newCamera('perspective')
camera.setParameter('aspect',anari.FLOAT32,width/height)
etc.
For “bulk” data like vertex or index arrays, volume voxel data, etc, I decided to mostly build on numpy – i.e., you’d load/create/manipulate the bulky data in numpy, then create an anari “array” wrapper, and use that:
vertex = np.array(....,dtype=np.float32)
array = anari.newArray(anari.FLOAT32,vertex)
mesh.setParameter('vertex.position',array)
Other than slightly adapting the API to look more pythonic, the second big “digression” from the true path of ANARI I made is to – at least for now – hard-bake a single backend implementation into the pynari pip-wheels: In theory, the ANARI API is supposed to be “abstract” in the sense that Khronos only specifies the API itself, so different vendors/developers can each provide their own implementations for it. In your ANARI application, the first thing you’d then do is specify which implementation you want by “loading” a specific “library” (say “ospray” if you’re on a CPU, or “barney” or “visrtx” if you have a RTX-capable GPU, etc). The problem with that is that this multi-backend thing makes the building of the python wheels annoyingly tricky, because you’d have to build all these different backends into the same python wheel – and though it’s probably “possible” to do that it certainly ain’t for the faint of heart (it’s already rather non-trivial, believe you me!). So, while I’m absolutely not trying to make a vendor-independent API vendor-specific on python, at least for now pynari has a single working back-end (and for those wondering, it’s obviously my “barney” GPU renderer). Consequently, to run the pynari that’s currently up on PyPI you currently need a RTX-capable NVIDIA GPU (Turing or newer, data center GPUs most certainly included!). If you have one of those, however, you should now be able to pip-install pynari on either Windows (python 3.12 or 3.13) or Linux (3.9 and newer).
Volunteers, one step forward!
Long story short: on either Windows or Linux, you should by now be able to simply do
pip install pynari
and then run any of the examples I’ve been providing on the pynari github repo (https://github.com/ingowald/pynari)… and of course, you should be able to modify these examples, add to them, write new ones, etc.
Fair warning: this really is “first light” for this package – the backend (barney) has now been used for quite a few different things, but pynari itself is still very “hot off the press”, and “not much tested”. I’m fairly sure there’ll be missing or broken things in there, and I’d certainly expect quite a few “hard aborts” if you do something in a way that isn’t supported yet. That said, I can’t be fixing things I don’t know about, so what I’m looking for is a set of adventurous “volunteers” that would be interested in at least playing with it. Install it, run it, let me know how it goes – send me an email, file an issue on github, comment to this post, … any feedback is useful. Extend some of the samples (I’d particularly like one that’d create a better test volume for the volume rendering sample!), or write your own samples, etc – let me know. And if you create some additional samples, I’d be happy to share them, either here or on the github repo. Any feedback is useful!
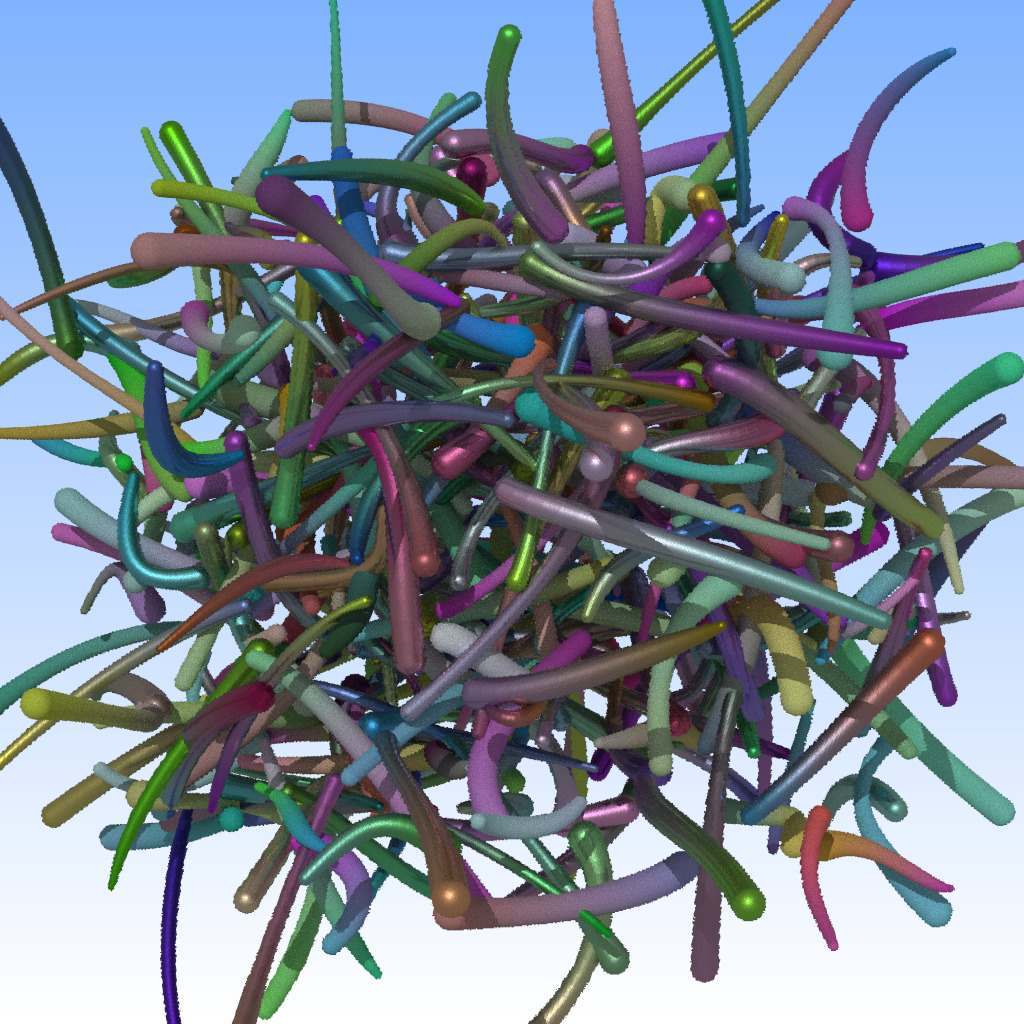
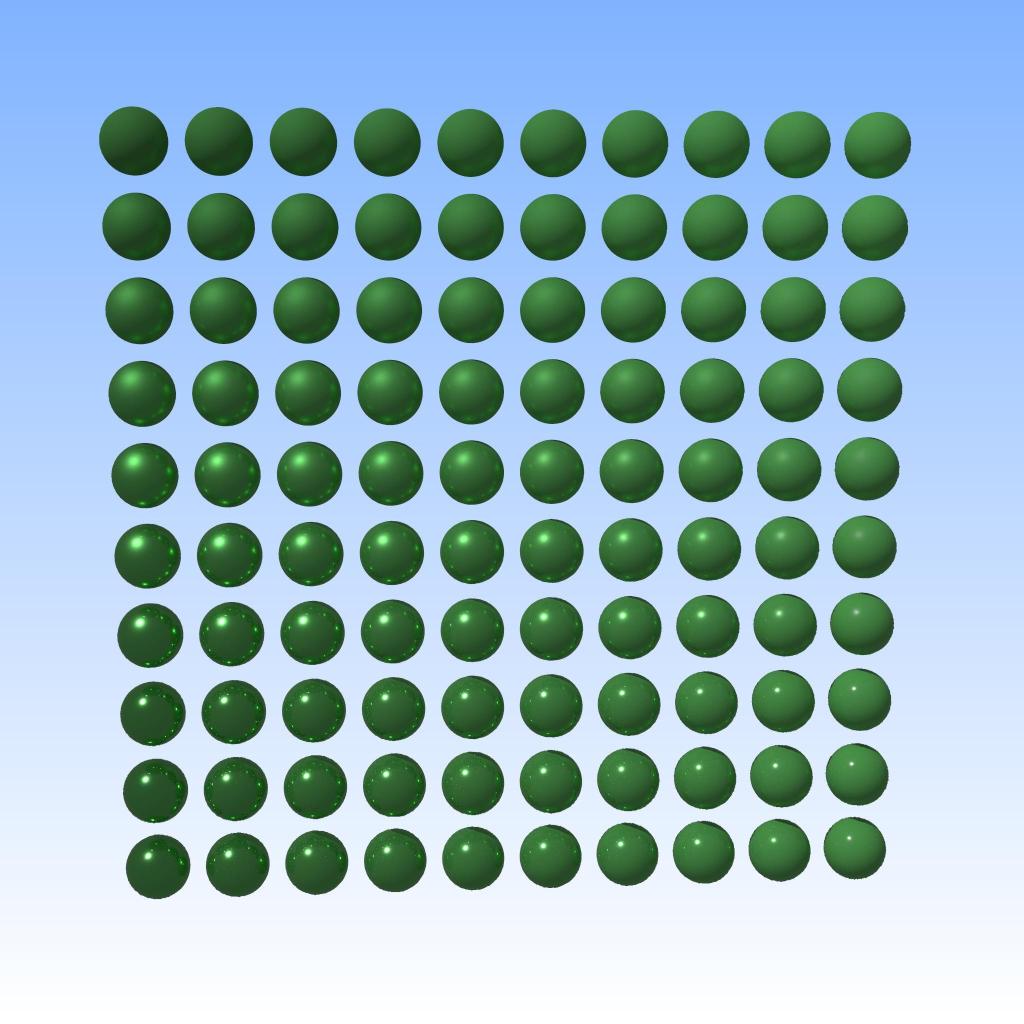
And finally, just some eye-candy to how what it can do (these are simply the samples from the pynari github repo):


(Note that the data-parallel MPI example – the fancy-colored cube of cubes – will not currently support MPI on the pip-installed package, you’d have to build the module locally for that).
And finally, to show that it really works even on Windows (the Linux part is always a given for anything that I have written…), here a screenshot I’ve taken last night after the buildwheel finally ran through:
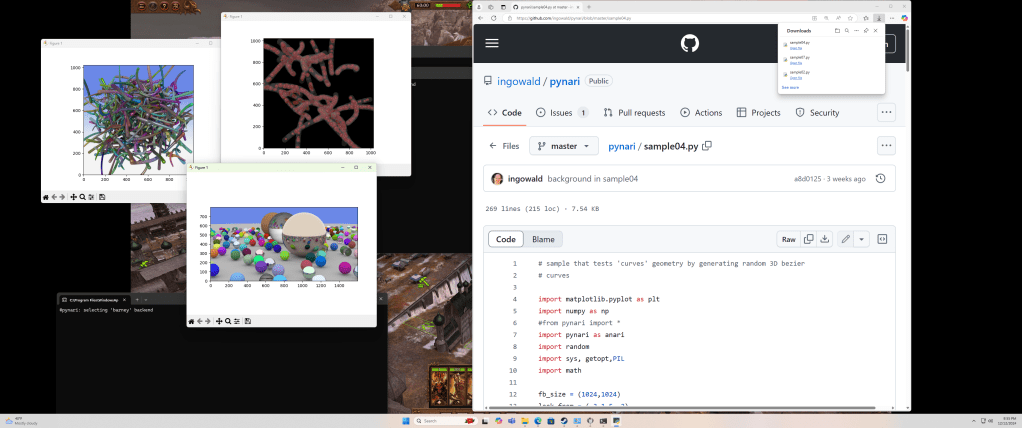
(the careful observer will notice Warhammer running in the background – I literally just ran that on the gaming machine my son was just playing on, and it worked out of the box!).
Kudos
Last but not least, a few kudos for those without whose help this wouldn’t have been possible:
- Wenzel Jakob:
pynariinternally makes heavy use of Wenzel’s amazing “pybind11” library (https://github.com/pybind/pybind11). Thanks to pybind, the actual python bindings were – by far – the least of the problems in building this. - Jeff Amstutz and anybody else behind the ANARI_SDK (https://github.com/KhronosGroup/ANARI-SDK):
pynaridoesn’t directly use the ANARI SDK – only barney does – but those folks were incredibly helpful in fixing things that were required to make barney work in pynari (such as building static libraries). - Jeff Amstutz and Stefan Zellmann – not involved in
pynariitself (yet?), but without those two barney would never had an ANARI interface to start with, and without barney-anaripynariwouldn’t exist. - Nate Morrical, from whose NVISII project I stole a lot over the years – BRDF components, guidance on building wheels, and many other things. (and without whom I’d probably never have started to learn python in the first place).
A few links for further reading (some of those have appeared above):
- The
pynarigithub repo, with a set of readily runnable samples : https://github.com/ingowald/pynari pynarionPyPI: https://pypi.org/project/pynari/ (currently on 1.0.36 as of this post)pybind11– the key to writing python bindings in C++ (while staying sane): https://github.com/pybind/pybind11 . I’ll probably soon start to write a blog series about how to turn bindings into complete wheels – that can be a journey! – but it all starts withpybind.- The official ANARI spec – describes what kind of object types there are in ANARI, and what their parameters are. Not all will be supported in pynari, yet, but this is what should exist: https://registry.khronos.org/ANARI/specs/1.0/ANARI-1.0.html
- The ANARI SDK – contains all to get you started if you want to write your own ANARI devices (though just using
pynariwill certainly be easier 🙂 ): https://github.com/KhronosGroup/ANARI-SDK . - A relatively recent paper about data-parallel rendering with ANARI – that’s probably not what you want to start with, but it also gives a bit of info on barney (the backend I’m currently using in
pynari): https://arxiv.org/pdf/2407.00179v1 or here https://www.researchgate.net/publication/381883066_Standardized_Data-Parallel_Rendering_Using_ANARI - Another paper about some of the technology behind barney: https://www.researchgate.net/publication/372855659_Data_Parallel_Multi-GPU_Path_Tracing_using_Ray_Queue_Cycling
- Pete Shirley’s “Ray Tracing in One Weekend”, whose iconic “spheres” scene obviously provided the template for ‘sample02’: https://raytracing.github.io/books/RayTracingInOneWeekend.html
