Having recently switched to NVidia I now – rather obviously – spend a lot more of my time coding in CUDA and OptiX; and one of the first things I noted is that getting the right CUDA/OptiX software stack on linux isn’t always as automatic as one would have hoped for. In this article I’ll provide some step-by-step instructions to get all of the software stack required for CUDA/OptiX installed on a Ubuntu box, hopefully serving as a copy-n-paste blueprint for whoever else wants to do that, too …. This post started as a google doc with notes to myself (yes, I did install rather a lot of different machines, recently 🙂 ); then it evolved into documenting this procedure for others; and finally led to the thought of “let’s just post it publicly, to whomever it may be useful”… so here we are.
Before saying anything else, one note on Linux versions: I personally prefer Ubuntu, and unless you’ve got a strong preference for another distro can only recommend Ubuntu 18, if only because it’s the only distro with which I managed to get two of my “integrated graphics plus nvidia mobile GPU” based laptops to work without having to use things like Bumblebee (shudder). However, the steps in this post should – with small modifications (such as using yum instead of apt when using CentOS) – also work on other distros.
Step 0: Make sure your Ubuntu box is up-to-date.
I assume you already have a working Ubuntu system. If not, feel free to grab a USB image from https://www.ubuntu.com/download/desktop, put it on a USB stick, and install it. I usually chose “normal install” with “install 3rd party drivers” enabled, but that shouldn’t matter much.
First, let’s make sure your machine is up to date: Log into your machine, open a terminal, and become root:

(from now on, I’ll omit the “root@machine”, and only list the commands, because that’s easier to copy-n-paste)
Once you’re root: update, upgrade, and reboot:
apt -y update
apt -y upgrade
reboot
If you run that on a brand new install, the upgrade may take a while, and download /install a lot of packages. This is OK.
Upon your next reboot, your system should be up to date in everything.
Step 1: Installing the latest NVidia Driver
There are, in fact, two ways of installing the NVidia driver: Using the Linux “drivers PPA” (personal package archive), or using the installer provided by NVidia. “In theory” the PPA is the easier method, because it provides ready-to-install packages, plus cuda, etc…. however, in practice PPA drivers are usually somewhat behind the latest version provided by NVidia, and if you have a slightly outdated driver you may end up needing to install an outdated CUDA, too, and …. you get the point. In this post I’ll therefore use the NVidia installer route. Should you already have installed the PPA drivers, you can – and should! – get rid of them by executing (as root)
apt purge nvidia*
Step 1.a: Download the latest NVidia driver
Go to https://www.geforce.com/drivers (or go to http://www.nvidia.com, then click on the “Drivers” drop-down menu). Download your appropriate driver; at the time of this writing this is 410.57.
You should now have a file Downloads/NVIDIA-Linux-x86_64-410.57.run (or something like that, if a newer driver has since come out).
Step 1.b: Install prerequisites
Open a terminal, and become root (“sudo bash” as above), then:
- Install compiler, dkms, libxi, xinerama, etc
apt -y install build-essential dkms libglfw3-dev pkg-config libglvnd-dev
- While at it, install some other useful stuff (not required for the driver install, but useful for the CUDA SDK and optix later on
apt -y install freeglut3-dev cmake-curses-gui libtbb-dev git gitk emacs25
Step 1.c: Disable Nouveau
Before we can install this driver, we first have to disable the default driver that your Ubuntu/CentOS has already installed for your card (“nouveau”). If you don’t do that, the driver will “install” without problems, but will not be able to start, because your GPU has already been claimed by that nouveau driver.
To disble nouveau, you need to do two things: First, create a file /etc/modprobe.d/blacklist-nvidia-nouveau.conf with the following two lines
# /etc/modprobe.d/blacklist-nvidia-nouveau.conf
blacklist nouveau
options nouveau modeset=0
Assuming you’re still root in a terminal, you can for example do that via
echo blacklist nouveau > /etc/modprobe.d/blacklist-nvidia-nouveau.conf
echo options nouveau modeset=0 >> /etc/modprobe.d/blacklist-nvidia-nouveau.conf
Once nouveau has been blacklisted, you need to update your initramfs to make sure that becomes active upon next boot. As root:
update-initramfs -u
Now, reboot.
Step 1.d: Install the Driver
Before we can install the driver, we first have to put our linux in “text mode”. To do so: Open a terminal, become root, and do
init 3
You should now have a text-only terminal. If no login prompt appears even after several seconds, press ctrl-alt-f2 / ctrl-alt-f3 until a console ‘login’ prompt appears. Log back in, and become root (sudo bash).
Now, go to the downloaded driver, make it executable, and run it.
cd Downloads
chmod +x NVIDIA-Linux-x86_64-410.57.run
./NVIDIA-Linux-x86_64-410.57.run
(of course, use the file names of the driver you downloaded, if you have a newer one).
During installation of that driver:
- The installer “probably” complains about “pre-install script failed”. That is fine; so ignore this warning, and select “Continue installation”
- When it prompts “Would you like to register with DKMS”, select “yes”. DKMS is the “dynamic kernel module management system”, which will make sure that kernel modules get automatically recompiled whenever a new kernel gets intalled – which you do want to do 🙂 ).
- If it warns about missing 32-bit compatibility libraries, just ignore. (If you absolutely do need those, have a look at https://linuxconfig.org/unable-to-find-a-suitable-destination-to-install-32-bit-compatibility-libraries-on-ubuntu-18-04-bionic-beaver-linux … but chances are, you won’t need them, anyway).
- When asked about running nvidia-xconfig: select “YES”
Once the driver is installed, reboot. After the next reboot, you can check if your driver is running by doing
nvidia-smi
which in my case shows something like this:
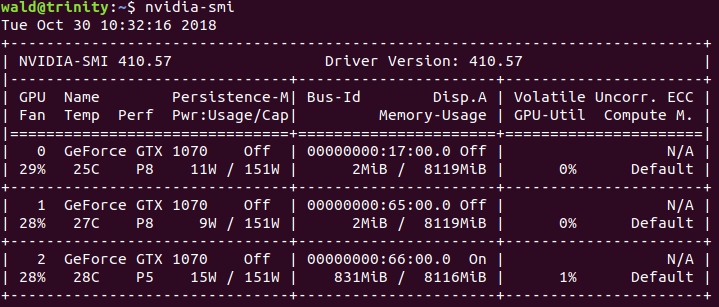
Congratulations, you now have the latest NVidia driver installed … yay 🙂 !
(and BTW: Since we did install DKMS and did enable DKMS in the driver install, this should automatically recompile the driver every time you upgrade to a newer kernel – if you don’t do this, chance are you’d have to manually reinstall the driver next time you get a new kernel!).
Step 2: Installing CUDA
Once the driver is running, the rest is fairly straightforward.
First, download the latest version of CUDA from http://developer.nvidia.com/cuda-downloads. In my case, the right choice is linux -> x86_64->ubuntu->18.04->runfile(local).
As of time of this writing, the name of the downloaded file is
Downloads/cuda_10.0.130_410.48.run
(of course, yours might be slightly different if a new version came out).
Once the file is downloaded, open a terminal, and become root (“sudo bash” as above). Now, install that runfile:
cd ~
chmod +x ./Downloads/cuda_10.0.130_410.48.run
./Downloads/cuda_10.0.130_410.48.run
Upon installing:
- Chances are your CUDA will want to install another driver. Since we already installed the latest one you should decline this option, and stick with the one we just installed manually. This means that the driver we use might be slightly different from the one CUDA expects, but as long as the driver is newer that is perfectly fine.
- In everything else, I stick with the default options, which installs CUDA to /usr/local/cuda/, and the CUDA SDK into your home directory.
Once CUDA is installed, it’s usually a good idea to put it into your PATH and LD_LIBRARY_PATH; for example like that:
echo "PATH=$PATH:/usr/local/cuda/bin" >> ~/.bashrc
echo "LD_LIBRARY_PATH=$LD_LIBRARY_PATH:/usr/local/cuda/lib64" >> ~/.bashrc
source ~/.bashrc
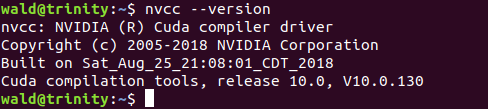
You should now have CUDA in your path, both in the current terminal as well as in all future ones. You can check this using
nvcc --version
which in my case shows the following:
Step 3: Installing OptiX
Once driver and CUDA are installed, optix can be installed under user priviledges. Just go to https://developer.nvidia.com/optix, clock on “Get OptiX”, and install the downloaded file (without becoming root).
With that, that’s pretty much it – you now have the most recent version of the driver, CUDA, and OptiX.
Final Notes
Some random final notes:
- While the instructions above are for Ubuntu, CentOS should work almost exactly the same way.
- I hope I’ll eventually find some time to write a similar introduction to OptiX, but at least for now, that’ll have to be it.
- I have done extensive testing of this procedure with both Ubuntu 18.04 and Ubuntu 16.04, but of course, things change, and/or I may have missed something – or mis-typed something – in the writeup. If that is the case, and you spot some errors, please let me know, and/or leave a comment re this issue. I do fully intend to update this article if and as new things come up, so any feedback is appreciated ….
